C# 닷넷 프로그램으로 윈폼을 개발할 때 윈도우 파일 탐색기의 폴더 목록과 같은 형태의 폴더 리스트를 구현해야 할 경우가 있습니다.
폴더에 포함된 서브 폴더까지 동일한 구조로 폴더 목록 리스트를 만들어야 할 경우 어떻게 하면 될까요?
윈폼(WinForms)의 TreeView 컨트롤을 사용하면 쉽게 파일 탐색기의 폴더 구조를 그대로 구현할 수 있습니다.
이번 글에서는 C# TreeView 컨트롤을 사용하여 윈도우 폴더 리스트를 구현 하는 방법에 대해 C# 프로그램 소스를 통해 알아보겠습니다.
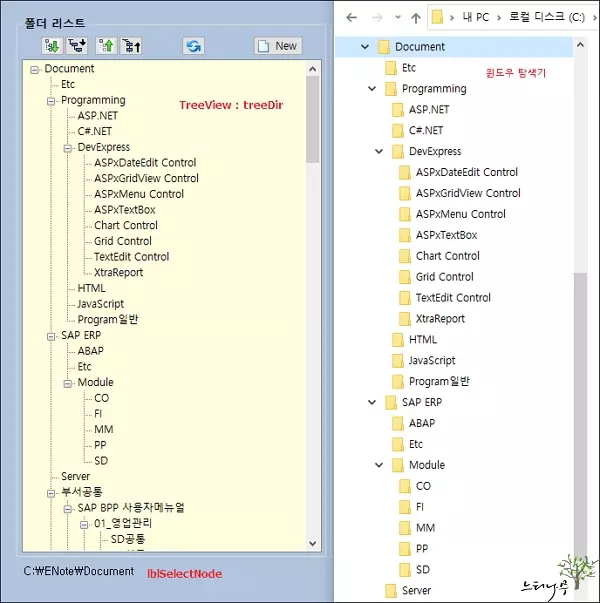
C#의 TreeView로 구현한 폴더 리스트와 실제 윈도우 파일 탐색기의 폴더 리스트 비교
▼ 아래 첨부한 이미지의 왼쪽 화면 캡처는 C#에서 TreeView로 구현한 폴더 목록 리스트 입니다.
오른쪽 화면 캡처는 실제 윈도우 파일 탐색기을 열어서 본 폴더 목록 리스트 입니다.
동일한 폴더 목록이 나타나도록 구현 된 것을 확인할 수 있습니다.
C# TreeView 컨트롤을 사용하여 폴더를 구현하는 프로그램 소스
▼ 아래 C# 프로그램 소스는 앞 단락에서 왼쪽 화면으로 표시한 프로그램의 실제 소스 부분입니다.
|
using System;
using System.Drawing;
using System.Windows.Forms;
using System.IO;
using System.Collections.Generic;
using System.Diagnostics;
treeLoad();
private void treeLoad()
{
treeDir.Nodes.Clear();
//폴더 목록을 표시한 특정 폴더를 지정합니다.
//실행 프로그램이 있는 폴더의 Document 폴더를 대상으로 하도록 지정했습니다.
string sDirPath = System.IO.Directory.GetCurrentDirectory() + @“\Document”;
TreeNode rootNode;
DirectoryInfo info = new DirectoryInfo(sDirPath);
if (info.Exists)
{
rootNode = new TreeNode(info.Name);
rootNode.Tag = info;
GetDirectories(info.GetDirectories(), rootNode);
treeDir.Nodes.Add(rootNode);
}
else
{
info.Create();
treeLoad();
}
List<TreeNode> Nodes = new List<TreeNode>();
AddChildren(Nodes, treeDir.Nodes[0]);
try
{
treeDir.SelectedNode = Nodes[0];
}
catch
{
treeDir.SelectedNode = treeDir.Nodes[0];
}
TreeNode trn = treeDir.SelectedNode;
if (trn != null)
{
trn.ExpandAll();
}
}
//서브 폴더의 Node를 구성합니다.
public void AddChildren(List<TreeNode> Nodes, TreeNode Node)
{
string sDirPath = System.IO.Directory.GetCurrentDirectory() + @“\”;
string sNode = lblSelectNode.Text;
if (sNode == “.”)
sNode = “Document”; //(.)루트 디렉토리명을 Document로 해줌.
else
sNode = lblSelectNode.Text.Replace(sDirPath, “”);
foreach (TreeNode thisNode in Node.Nodes)
{
if (thisNode.FullPath == sNode)
Nodes.Add(thisNode);
AddChildren(Nodes, thisNode);
}
}
//서브 폴더까지 반복적으로 폴더를 추가합니다.
private void GetDirectories(DirectoryInfo[] subDirs, TreeNode nodeToAddTo)
{
TreeNode aNode;
DirectoryInfo[] subSubDirs;
foreach (DirectoryInfo subDir in subDirs)
{
aNode = new TreeNode(subDir.Name, 0, 0);
aNode.Tag = subDir;
aNode.ImageKey = “folder”;
subSubDirs = subDir.GetDirectories();
if (subSubDirs.Length != 0)
{
GetDirectories(subSubDirs, aNode);
}
nodeToAddTo.Nodes.Add(aNode);
}
}
|
마무리
C#에서 TreeView 컨트롤을 사용하면 비교적 쉽게 트리 형식의 구조를 구현할 수 있습니다.
예제에서는 컴퓨터의 폴더를 그대로 가져와서 보여주는 내용으로 구현했지만 용도에 따라 다양한 형식으로 Tree 구조를 만들 수가 있습니다.
※ 함께 읽으면 도움이 될 만한 다른 포스팅 글입니다.
이 글이 도움이 되었기를 바랍니다. ^-^